Easy Step by Step Watercolor Paintings That Look Awesomely Real
This post may contain affiliate links. We may earn a small commission from purchases made through them, at no additional cost to you.
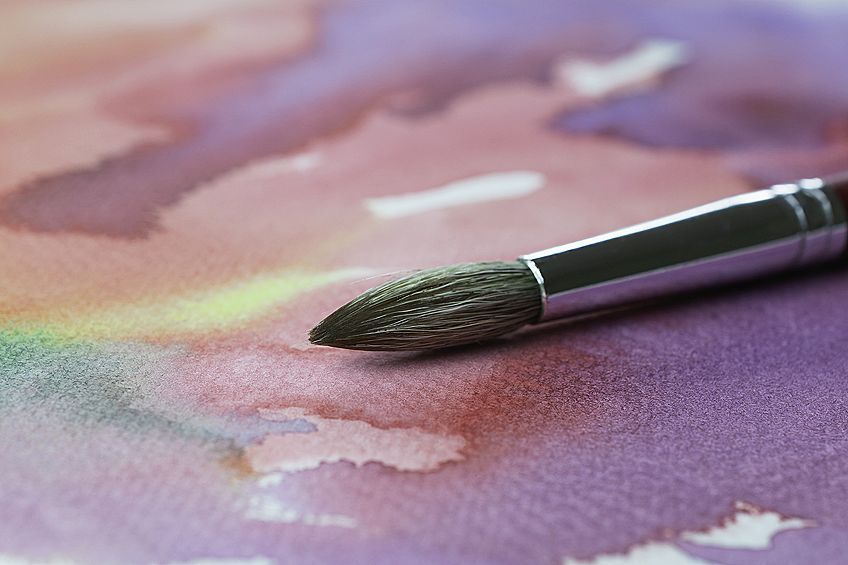
Interested in immersing yourself in the world of watercolor painting, but don't know where to start? You've come to the right place. In this article, we will highlight and deep dive into creative watercolor painting ideas that you can play around with and use to gauge your inner watercolor artist. You can look forward to easy watercolor ideas that still develop and challenge your skills as an artist.
Table of Contents
- 1 What Are Watercolor Pens and Pencils?
- 2 Mixing Watercolor Paint: A Guide
- 3 Trying Out Beginner Watercolor Techniques
- 3.1 The Flat Wash Method
- 3.2 The Gradated Wash Method
- 3.3 The Wet-on-Dry Method
- 3.4 The Wet-on-Wet Method
- 4 Different Watercolor Painting Ideas for Artists
- 4.1 Watercolor Painting Tutorials for Floral Images
- 4.2 Watercolor Painting Tutorials for Landscapes
- 4.3 Watercolor Painting Tutorials for Creative Concepts
- 5 Frequently Asked Questions
- 5.1 What Are the Ideal Shades for Fall Watercolor Painting?
- 5.2 What Are the Easiest Beginner Watercolor Ideas?
What Are Watercolor Pens and Pencils?
Watercolor art is mainly done with your standard watercolor paints. However, this is not the only medium that can be used for watercolor pieces. Watercolor pens and pencils are incredibly popular too, thanks to their easy-to-use nature for watercolor beginners. Watercolor pens are a useful combination of the stunning hues that watercolor paint offers, along with the simple nature of a marker. The pen is filled with ink that is both water-soluble and dye-based which can be used directly for rich hues or dipped in water to dilute the color.
Watercolor pencils are also water-soluble, being used in the same way that a regular pencil is. However, you can dip the pencil in water too for a more dilated look that is commonly associated with watercolor paints. These watercolor pens and pencils are ideal for those who are just starting in the world of watercolor paint, especially when it comes down to working on the finer details of a painting. You can outline thin borders and objects, create fine details, and add final touches to your watercolor painting with these useful utensils.
Mixing Watercolor Paint: A Guide
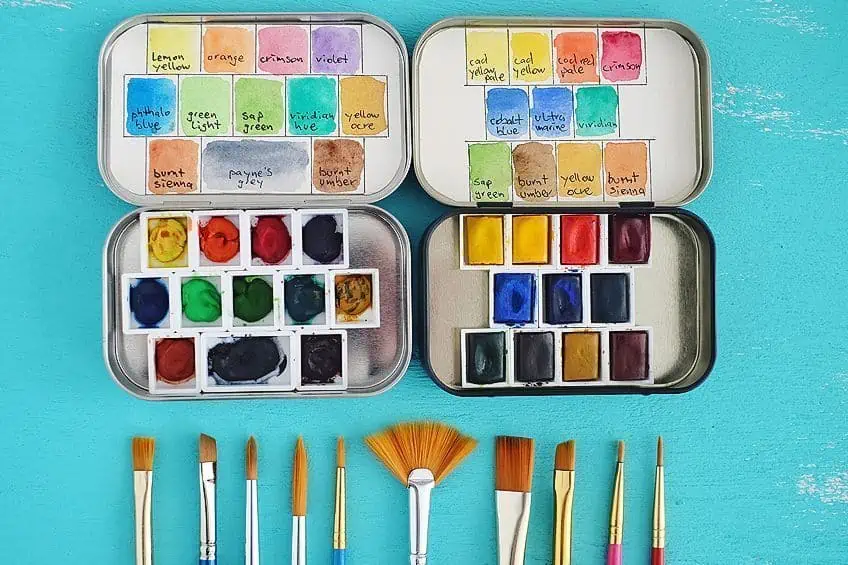
Watercolor art is taken from good to great through the use of vibrant color usage. If you have only one watercolor palette or are short on a certain shade, don't worry. You can simply mix two colors for your desired shade. You will need the following supplies to begin mixing watercolor paint:
- A watercolor set
- Watercolor brushes (at least two round brushes)
- A bowl or jar of water
- Scotch tape
- Watercolor paper (300 GSM size is ideal)
The best way to keep tabs on your mixing process is to establish a watercolor chart. This chart will help you remember which colors made what specific hue. This chart will be done in the form of a grid that goes vertically and horizontally, at an average size of 2 x 2 cm (but you can change this sizing to what size you prefer). Use a standard HB pencil and a ruler to create these blocks.
However many blocks you use will be directly in proportion to the number of colors you have in your watercolor set. For example, if you have 12 watercolor shades, you will do 12 rows both vertically and horizontally. This will make up 144 blocks in total. paint each color that is present in the watercolor set next to each block done vertically and horizontally, while keeping the same sequence in both rows.
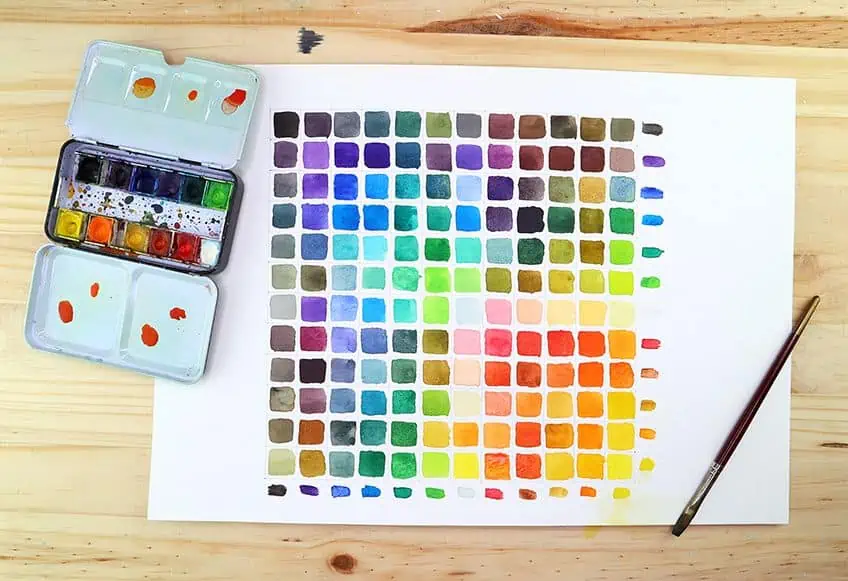
After this, you will begin to mix each paint that matches up on the row, going from the top left to the bottom right. Mix colors that begin to intercept on the grid, based on your flow vertically and horizontally (for example, mixing the red and yellow for an orange hue). You will begin to notice some stunning color variations when certain shades are mixed, which are ideal for when you are short of a certain color.
This method will help save you money on buying various watercolor palettes unnecessarily. Remember to keep cleaning your watercolor brushes after each mix and application to avoid any accidental cross-contamination of colors.
Each mix of colors will present its shade variations that will be easily remembered going forward thanks to this color chart you have created for yourself.
Trying Out Beginner Watercolor Techniques
Watercolor techniques make a major difference in the overall outcome of your painting, as each technique offers a vastly different finish to the next. Here are some methods which are useful for all watercolor beginners to be familiar with, so that they can create different textures and details. This is what you will need:
- A watercolor set
- Watercolor brushes (one or two round brushes, a flat brush, an oval wash brush)
- Watercolor paper
- Cardboard
- A dish for mixing watercolors
- A bowl or jar of water
The Flat Wash Method
The first method we will discuss is the most basic of watercolor methods used by all. For this, you will use both a dish and a water jug; one to dilute and mix colors, and one to clean your brush after application. Begin by dampening your paper, followed by wetting your brush. Pick up watercolor pigment from the palette and place the pigment onto your dish; adding a little water to mix. Paint over the paper and begin to play around with different strengths of pigment by mixing different ratios of watercolor paint to water itself.
Don't forget to clean your watercolor brush in a different water bowl.
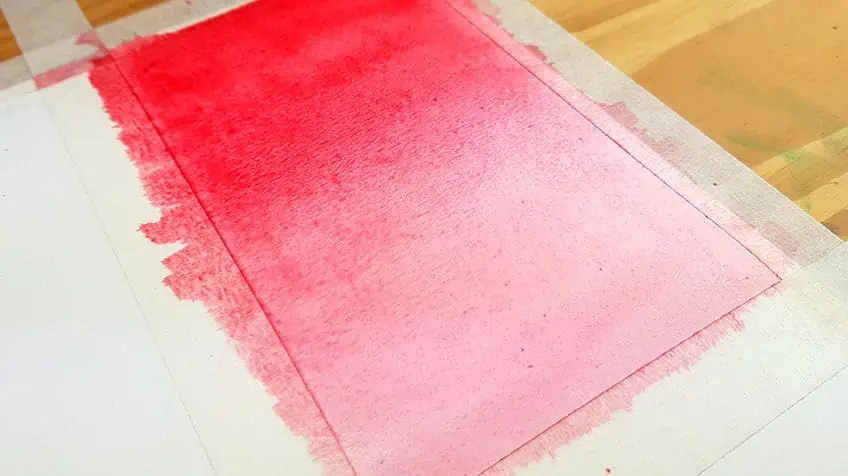
The Gradated Wash Method
Another basic yet simple method, this technique is designed to create an ombré-type effect with watercolors. First, wet your paper with your flat brush, then apply a moderate amount of color to the brush. Begin to paint from the top left to the right of your paper with slow brush strokes, working downwards. You will notice that with each stroke going downward, the pigment will become more diluted as the paint comes off.
The Wet-on-Dry Method
This method sees you applying various colors onto a dry piece of paper. Take your first shade and paint whichever area of the paper you wish, followed by other colors. You can use as many as you want, but three should be enough to show you how this method works.
You will notice you have more control of flow and merging colors with this method, making it the best method for a project that requires color consistency.
The Wet-on-Wet Method
This method is commonly used for watercolor painters that seek distinct contrast. Grab a sheet of paper and wet it with whichever brush you choose (flat is easier for this). Afterward, apply a moderately mixed watercolor shade, followed by a different shade of the same hue right after while the paint and paper are still wet. You will notice how this method creates vibrant colors that contrast well as they are more solid (due to water density).
These are only some of the watercolor techniques out there since there is a myriad of different methods to create a stunning work of watercolor art. However, these specific watercolor techniques are considered the basics for watercolor painting ideas.
Different Watercolor Painting Ideas for Artists
Now that we have more details about what constitutes watercolor paint and the various methods that can be used, we can dive deeper into easy watercolor ideas. We have some useful beginner watercolor ideas for you to utilize and develop your water painting skills, with everything from delicate floral image painting ideas to more abstract, unique watercolor painting suggestions. These beginner watercolor ideas will ensure that your watercolor paintings are anything but boring! This is what you will need:
- Small, medium-sized, and large round watercolor brushes
- A flat watercolor paintbrush
- Two bowls or jars of water
- Watercolor paper
- Watercolor paints
- A watercolor pen/pencils
- A standard HB pencil
- A cold press watercolor pad
- Paper towels
- A toothbrush
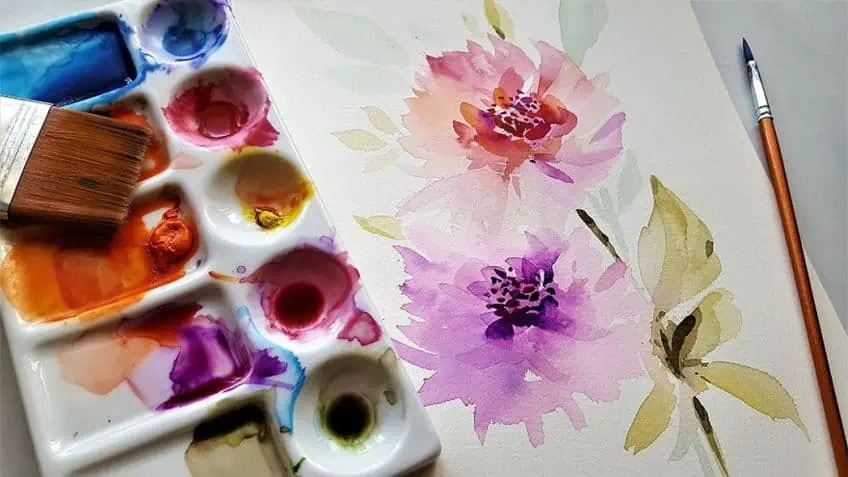
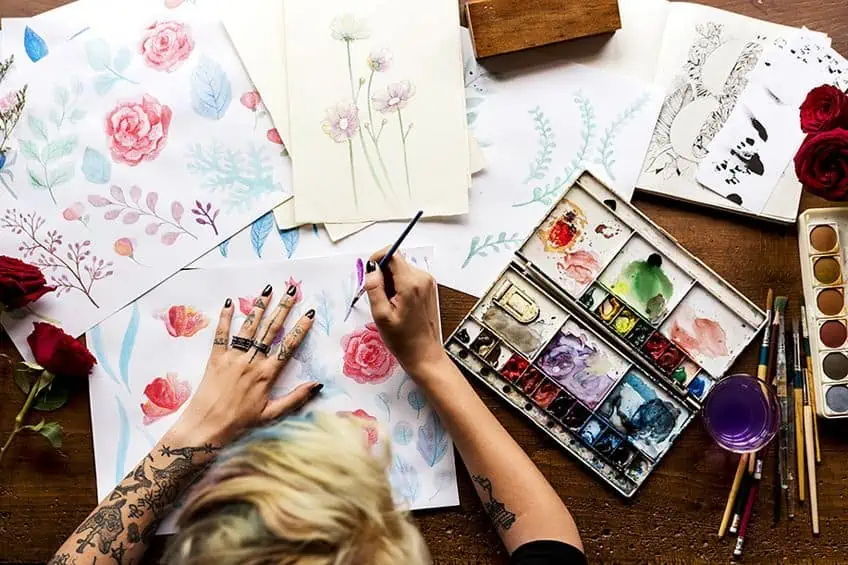
Watercolor Painting Tutorials for Floral Images
Delicate floral artworks can be made more enticing by using easy watercolor techniques to perfect the method. The soft hues of watercolor paint can complement floral paintings perfectly, and you don't need fancy methods to create a truly stunning artwork either.
Creating Watercolor Roses
First, let's discuss how to create classic roses with watercolor paint, without the need for any fancy utensils or expensive equipment. Dip your paintbrush (small or medium) in the bowl or jug of water and create a loose outline of a rose. A rough design to simply create a scale and shape of the rose is enough.
Next, fill in the rose with your preferred color (red is the most commonly used). Keep in mind that the outer layers of the roses are bigger and may need more free-flowing, loose brush strokes. It's mainly about creating a basic shape and color of the rose at this point. Since painted roses are more abstract.
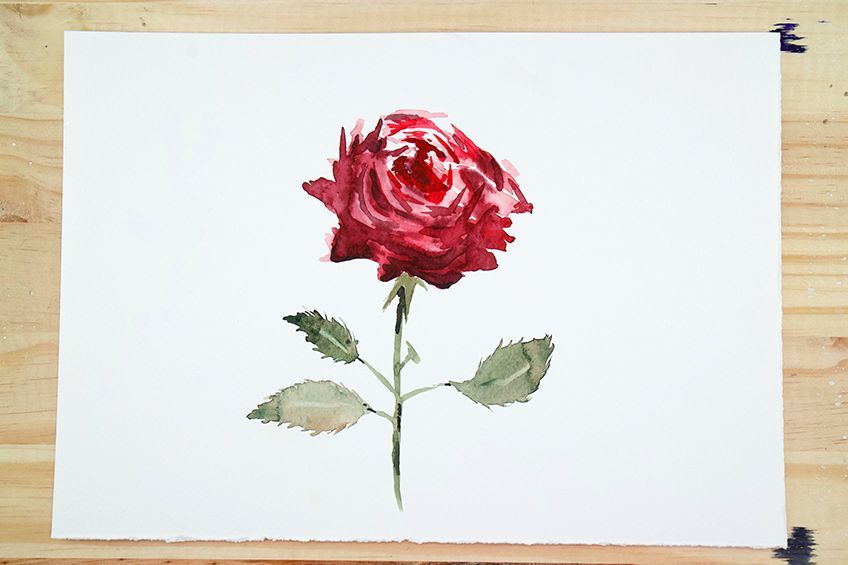
The next step sees you adding a contrasting color to the image to create depth. Grab a darker red or black shade of watercolor and begin to fill in the rose by creating jagged strokes in various directions for a shadow effect, and more abstract shapes. Take a clean, dry brush and create the shapes of petals while the painting is still wet for more tone and texture.
The last layer is where most of the definition and playful creativity comes in. Grab a small brush or watercolor pen and add in different tones within the area at the top section of the rose, A different shade of red or pink is ideal for contrasting purposes. You can also add darker hues at the bottom, larger petals for an extra effect.
This simple method will help you easily create a soft yet detailed watercolor rose in quick time.
Creating a Watercolor Sunflower
Much like roses, sunflowers are a well-loved flower for artists to paint and admire. It may seem as though lots of time, attention, and detail must go into creating a watercolor sunflower, but that's not necessarily the case. There are easy watercolor ideas that outline how to effectively paint a striking sunflower in watercolor paints without lengthy tutorials. The easiest way to begin would be to draw a basic outline of the sunflower, including the petals and the small blossoms or seeds in the center of the flower. This outline will make the process easier as sunflowers are more specific to paint as opposed to roses.
Next, grab a small brush and begin to paint the outer part of the sunflower, being the petals themselves. A bright, lighter yellow is the best choice here, as you will add a darker color of yellow or light brown later for contrast. During this, feel free to add some yellow stipples within the center of the flower too for contrast purposes later on.
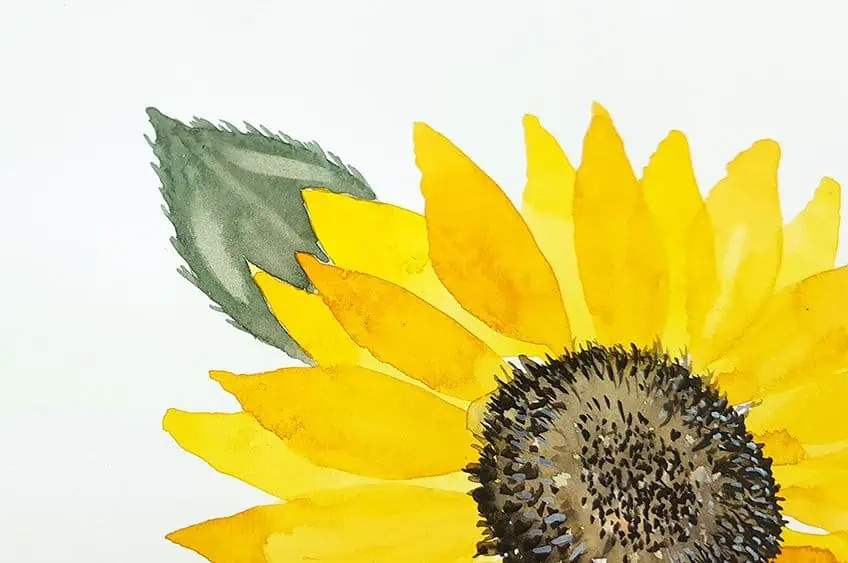
Once that is dry, you can begin on the inner part of the sunflower. Start with a light brown around the outer part of the center, leaving the center out. Then you can begin to fix the center with a darker shade of brown, also adding some strokes to the light brown for the look of texture. Finally, you can add some extra black tones within the center, focusing there and slowly creating some contrast of black in the light brown outer layer through brush strokes going one way.
Finally, it's time to add the finishing touches. Grab a clean small brush and apply an orange shade to it. Paint the inner part of the yellow petals with this hue for more dimension of the petals themselves, starting by the base of the center. Stretch the orange hue out to the mid-tone areas of the petals, where you created the outlines in the beginning. Blend the two colors with a darker shade of yellow between the light yellow and orange shades. You can add a black border around the center of the flower for a final touch.
This watercolor paint idea is quick and easy, without compromising on achieving a realistic-looking sunflower.
Creating Watercolor Poppies
Another firm favorite among artists to paint is the common yet well-loved poppy flower, thanks to their delicate aesthetic that perfectly contrasts with their bold colors. Luckily this simple flower is already fairly easy to paint, however, we have a method that ensures a quick and simple process.
As with the sunflower method, you will start by drawing a basic outline of the poppy flower with a pencil (you can find templates online). Once that is done, grab a paintbrush and wet the area within the poppy flower design. Choose a color (perhaps red, orange, or blue) and begin to drop it slowly onto the outer area, being gentle with your blotches. You can drop the colors in the middle areas of your poppy flower too. Once the basic painting structure is achieved around the poppy flower, select a different shade of hue that is lighter and complements the already-existing color. Use that shade to add color to the inner petal areas and other selected areas of petals for contrast.
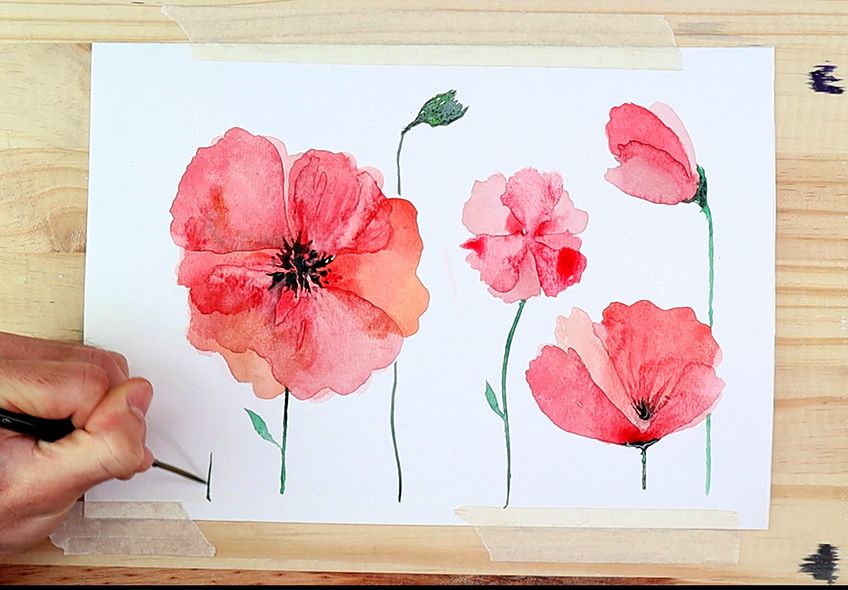
For a richer hue, you can thicken your water paint medium and add a brighter shade of the first color used as a second layer. This brighter color will help to create a more vibrant image. Apply this thicker, richer hue to the outline and innermost center of the petals. Use long strokes in one direction for the flow of the inside of the petal outwards.
Once all dry, you can repeat these steps once again for a richer poppy flower image. Use black color to add details of the poppy flower within the image, including the black inner-section of the poppy flower. Use a faint dark shade to create an outline of the petals, along with faint short line-markings at the top of the petal for an added extra touch.
This is a brief, simple way to create dainty poppy flowers in watercolor format, without losing any of the flower's popular rich hue.
Creating Watercolor Leaves and Stems
Once you've created your stunning flowers, you may want to add a bit of flair to them with watercolor leaves. There's a great way for you to include leaves in whoever flower painting you wish, from specific flowers like poppies and roses to a broader type of flower too. An easy method called "drag-press-lift" will be the one we use, as it's a relatively easy method. Only two different green shades are needed to create the desired effect. Grab a small round brush and dip it into one of your two chosen shades.
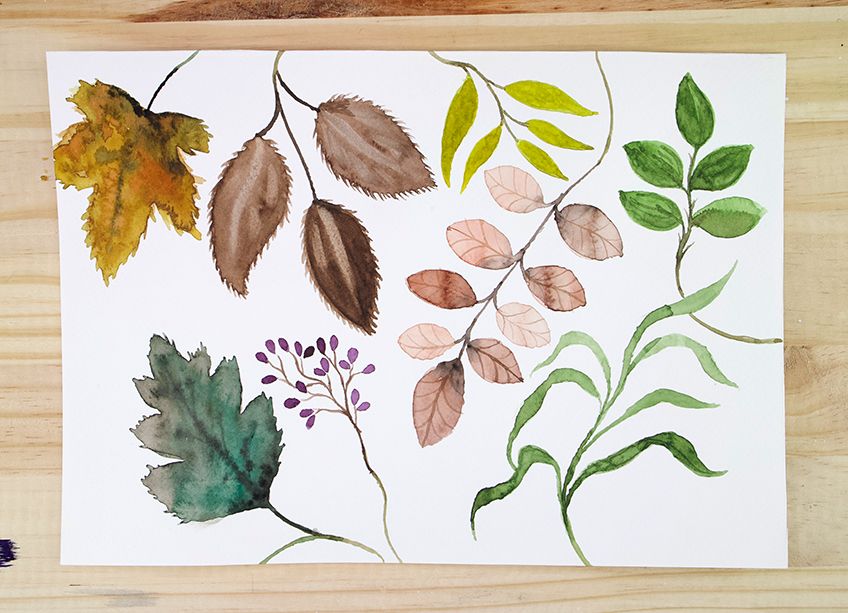
Hold your brush as if you're holding a pencil and gently create a stem with soft strokes going in one direction. To create the leaves, begin at the start of your stem, pressing down then gradually lifting as you create your leaf. Repeat this method for the other leaf. This method is the easiest way to create leaves and stems for all flowers including the above-mentioned ones.
These tutorials offer easy watercolor art ideas that are ideal for watercolor beginners that wish to develop their skills.
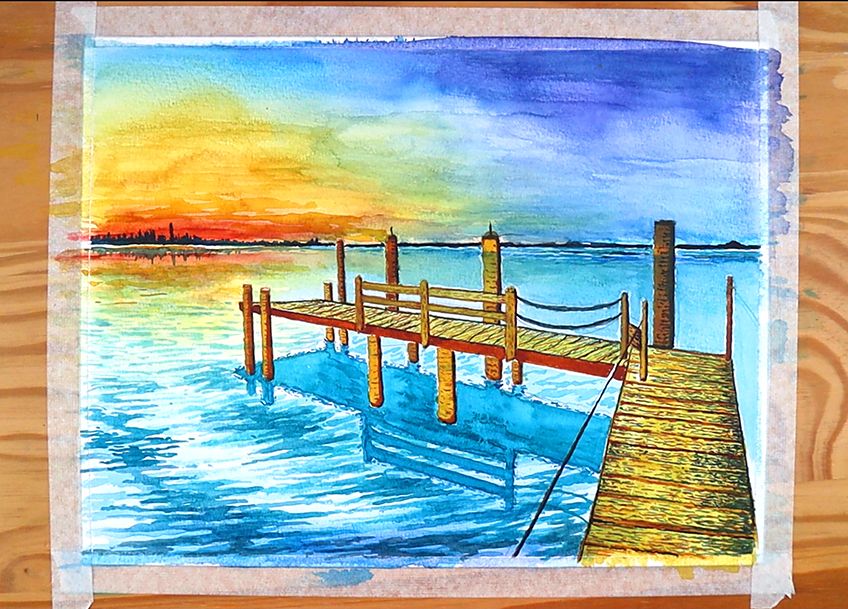
Watercolor Painting Tutorials for Landscapes
If you're feeling ready and confident enough to expand your art to further than flowers, a great next step would be to paint landscape images with more floral and environmental detail in them.
Creating a Sunset with Watercolor
A breathtaking sunset is essential in creating a landscape painting that grabs attention. You may think that it's difficult to create a sunset, especially if you're new to the world of watercolor painting. However, it's easier than you may think. Begin by dampening your paper to get it ready for blending. It's advised you start at the lightest section, being yellow in this instance. Use a light hand to add the yellow, followed by a pink hue above it.
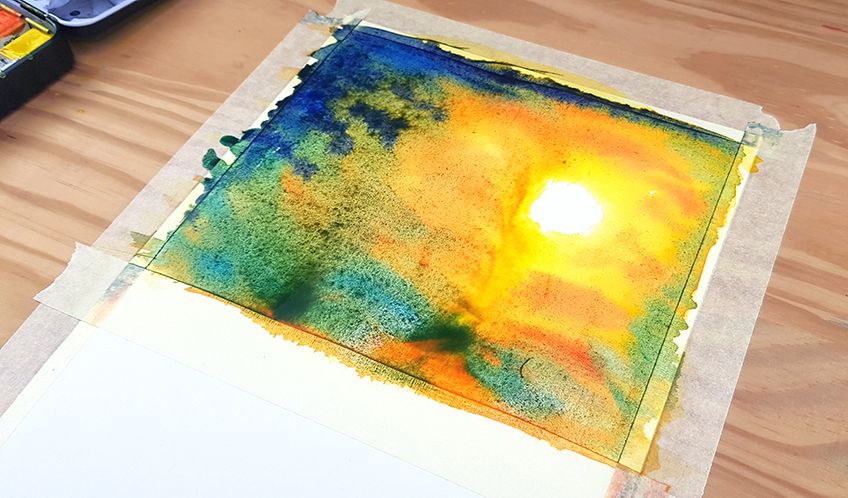
While the two different colors are still wet, blend the two shades in the middle for flow. Once that's done, take a blue shade and paint above the pink shade. Use the same method as before to blend the two colors. Finish off the backdrop with a darker blue and blend. Let the first layer of the paint dry and repeat the color painting process, this time, without wetting the paper first. Blend the colors once again. To finish off the painting, use the stippling method to create the illusion of stars in the sunset sky with white paint. This final touch creates a dreamy sunset to night-sky look.
A seemingly difficult painting to create is easily pulled-off thanks to this easy method.
Creating Watercolor Trees
Trees are an amazing addition to any landscape image as it brings more detail into the scenery. There's no need to use difficult methods for realistic watercolor trees, as there is a myriad of easy watercolor art ideas for trees. First, grab your standard pencil and sketch the kind of tree you wish to paint on a notepad. (you can find a simple template online). Add shading in the tree to highlight the areas that are going to contrast with other areas, keeping the natural shading of a tree in consideration. The top of the tree is generally lighter while the center is darker. Once that's done, you can draw a light general outline of your tree on your watercolor pad with more knowledge on how your shading areas will look. Begin to dab a green shade on most of the branch area with a dry brush dipped in the slightly mixed watercolor paint.
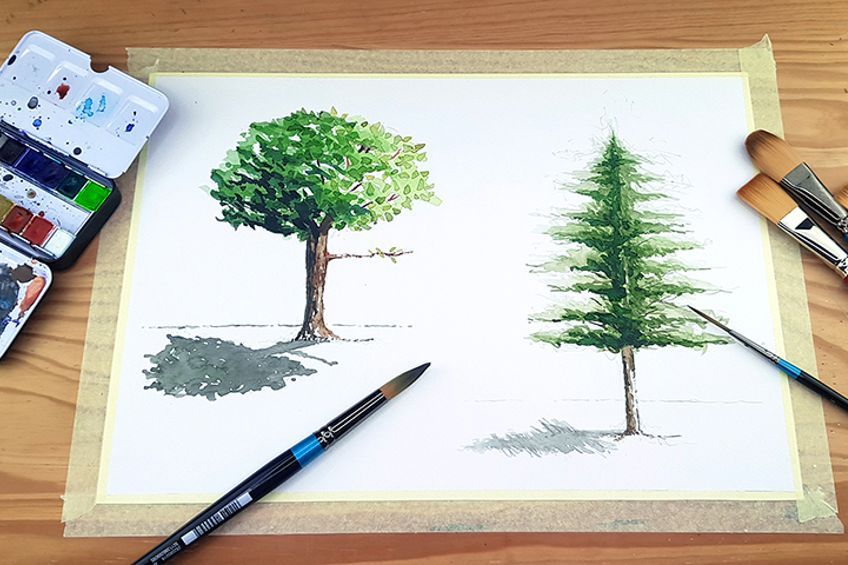
Dab and flick the paintbrush in specific areas to create the look of leaves, along with jabbing. Next, paint other areas a darker shade of green for shading purposes, going over the areas you highlighted in your rough sketch of the tree. You can use the same method mentioned earlier for the leaves too. For the tree trunk and branches, the lifting technique will create a more dimensional look. You can use two different shades of brown if you are seeking more depth. Add extra green leaves once done for the final touches, which can be done with a dry brush for maximum effect.
This method will ensure a realistic-looking watercolor tree in no time!
Creating Watercolor Clouds
Clouds add a dreamy touch to any landscape painting, and thankfully, they're quite easy to do too. They also add a lovely finishing touch to a calming mountain painting or similar landscape image. Begin by sketching your clouds very lightly for reference, and keep the future shading in mind too. Wet the paper and begin by painting a soft yellow hue with big brush strokes to show the position of the clouds (the "hanging" areas).
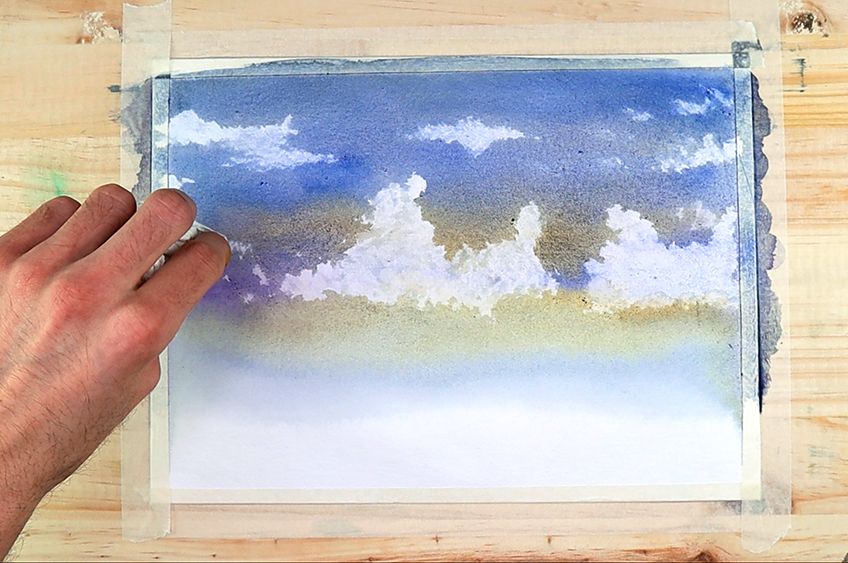
Next, take a blue shade and paint the space between the clouds, using sporadic, loose brush strokes. Use a grey hue to create some shadows within the clouds, giving it a more realistic look. Focus on the bottom-middle section of the clouds. You can add a second layer to the blue for a more vibrant image.
This quick yet effective method will be foolproof for all your watercolor landscapes going forward.
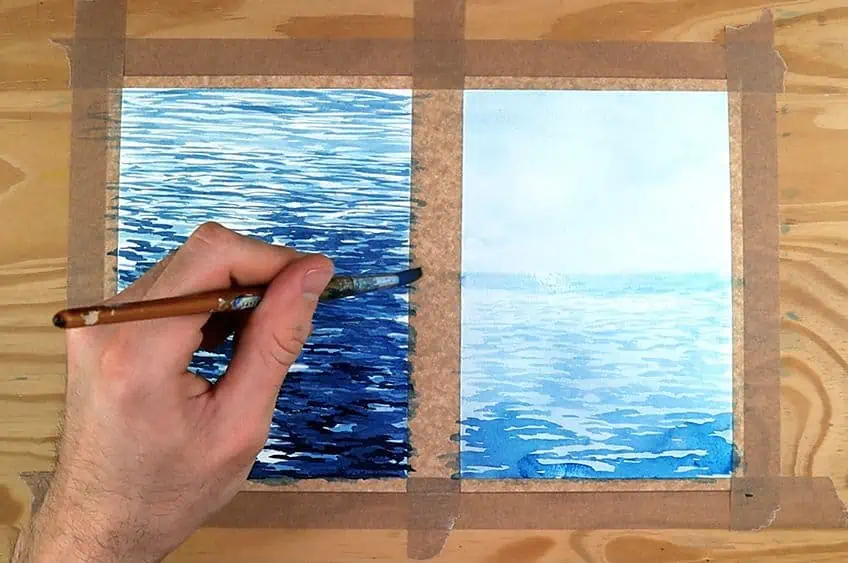
Creating a Watercolor Beach
Watercolor beach paintings are a favorite for artists to paint, and all of the above-mentioned extras including sunsets and clouds help finish off this serene painting. The process is a bit more detailed, but not particularly difficult. Dampen the entire paper and begin painting blue over the area that will be both the sky and water, leaving the bottom area out. Use a different shade of blue and paint over this area once more for more vibrant colors.
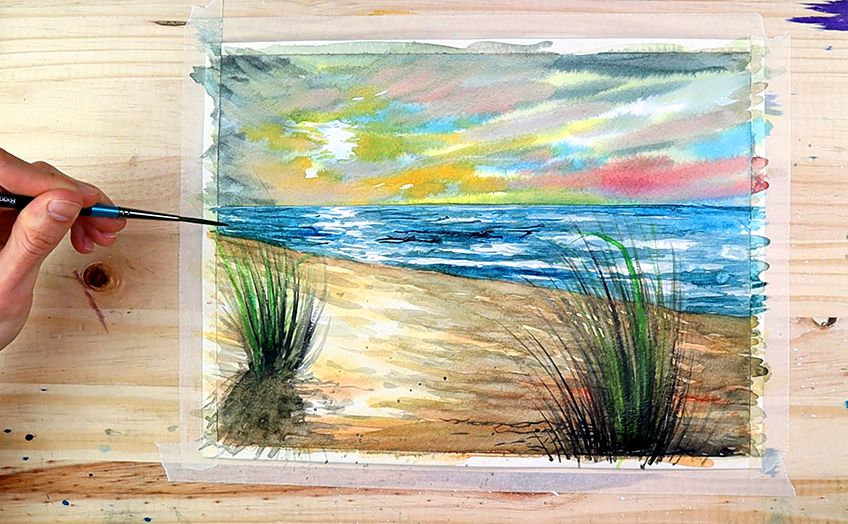
Take a paper towel and gently blot over the top area that will be the sky to create some dimension or look of clouds. Afterward, use a darker blue and paint the bottom part of the blue section to create the sea, leaving a white space between the sky and the sea. Do this as many times as necessary for rich color and use the dabbing method to create waves. Use a brown hue to paint the bottom and create sand. You can let the color go up to either side to create a more angled view of the beach. Add a darker blue in the white space you left between the ocean and the sky to create depth.
You now have a basic yet distinctive ocean watercolor painting, which you can customize as you go along.
Creating Watercolor Mountains
Mountains add some awesome detail to any landscape painting and can provide the perfect backdrop for a stunning sunset too. Painting mountains is an easy task, made easier by this simple method. Wet the paper and add a shade of blue towards the top of the paper to create the sky. Let that completely dry, and then proceed to make mountain shapes with the paint towards the middle and bottom of the paper. You can either stick to shades of blue (which is ideal since it's easier) or your preferred colors.
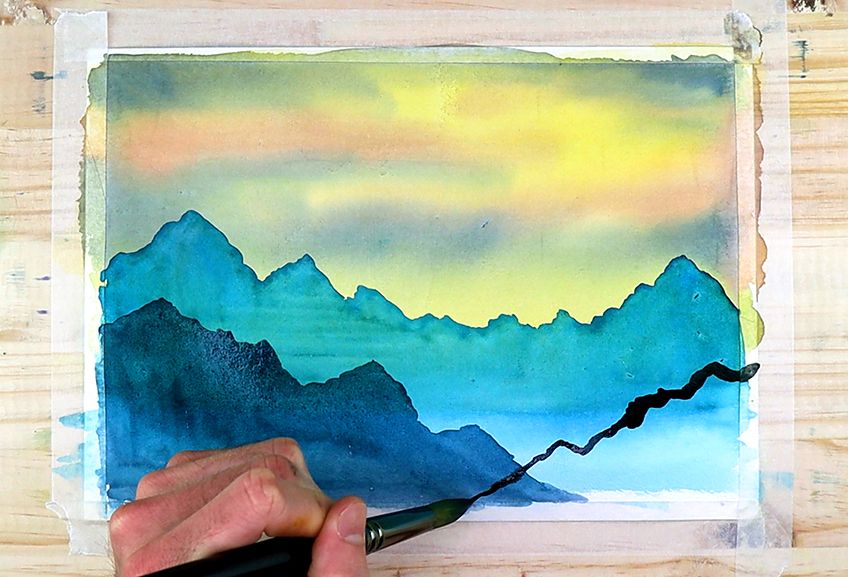
Create layers of the mountains, each with a darker shade that can also be achieved with more concentrated paint used. The darkest mountains should be at the bottom of the page for dimension. Create texture on the mountains and perhaps some trees with a smaller, fine brush. That is all you need to do to create a stunning mountain backdrop with minimal effort and maximum results.
Most of these methods may be complied together to create one striking landscape, either with a more rustic mountain landscape, or a playful beach setting.
Watercolor Painting Tutorials for Creative Concepts
If you want to expand your watercolor ideas, you can always try out something different from the standard flower and landscape images through means of abstract watercolor paintings. Unique watercolor ideas from mesmerizing galaxies to dainty butterflies will help you develop your watercolor art. Most of these painting ideas can be put together to create one striking watercolor painting or can be painted as a stunning stand-alone piece. If you're new to the world of watercolor paints, your safest bet is to practice each of these on their own before combining any.
Creating a Watercolor Butterfly
Painting watercolor butterflies are an awesome way to exercise your creative brain, whether you want to add a delicate butterfly to an already-existing painting or want to make it the main focus. Start by creating an outline of the butterfly wings and the middle of the butterfly's body with a wet brush (you can find templates online). Grab a light color and paint the outline of the top wings with this shade. Use a darker shade for the bottom wings.
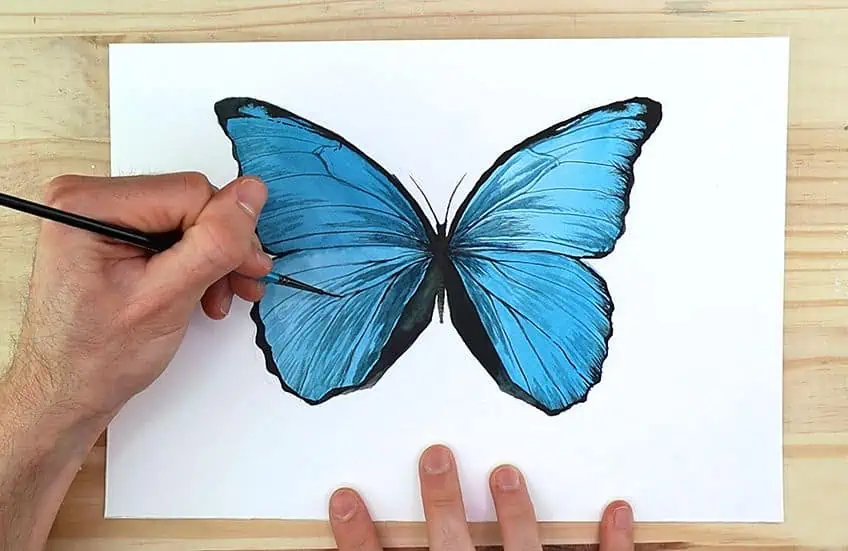
You can use different complementary colors for the outside of the wings vs. the inside. Fill in the butterfly's body and antlers with a black or brown shade. You can continue to add details to the wings as you see fit, depending on which butterfly you based your painting on. This method will only take a few minutes at best and helps to create a basic yet beautiful butterfly to add to a stunning landscape.
You can also paint it in a way that looks like it's currently flying through different templates online.
Creating a Watercolor Galaxy
Painting a watercolor galaxy may seem intimidating, but the process is simple. This method we will highlight is quick and easy, yet still leaves you with a striking image. Begin by dampening your paper. Use vibrant, light colors including pink, yellow and purple to cover the entire paper (begin with the lightest color in the middle and work outwards with the darker shades. Blend the shades.
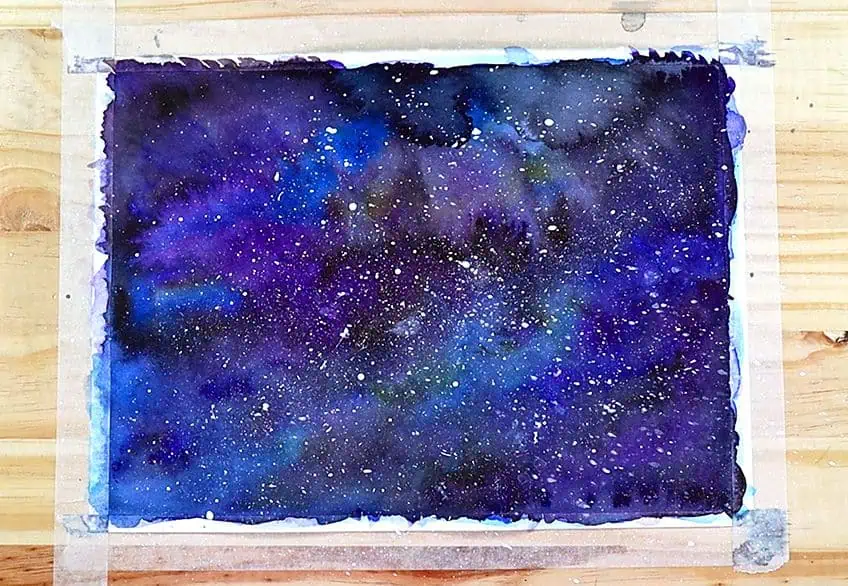
Let the paint fully dry and then add these colors once again, this time, adding them at random on the paper with cloud-type shapes. Put minimal extra color on the painting to keep the light center, but still add a pop of hues here and there in the center. You can add an extra layer once dry with some small details if you wish for more depth and vibrancy. For the final touch, add white to your toothbrush and use the splattering method for this. You can use a fine paintbrush afterward to create more striking stars too.
This method will only take a few minutes but gives you a vibrant galaxy painting without any fancy equipment or complicated instructions.
Creating Water Surfaces with Watercolor
If you want to make a body of water the main focal point of a painting, some methods can help you create a realistic yet easy water setting. The first thing to consider is the background of the painting. Remember that water reflects its surroundings, so keep that in mind when painting a body of water. Wet the area that will be your body of water. Use shades that are indicative of the surroundings (for example, trees and greenery will need a blue-green mix of watercolors to look realistic). Paint the first layer, using a pale blue to cover the water area.
Use broad, loose strokes. Add in some of the green-blue mixes for depth, using smaller strokes (but still being light-handed). You have to rely on your instincts in terms of placement for these shades, depending on the location of your water. However, the safest option is to add the green-blue shade in the middle of your body of water. Remember that these shades must blend and not contrast. This is the easiest way to paint water for beginners. There are other more complex ways, but this method is best for those just starting.
Whether you're a painting enthusiast that's new to the world of watercolor paint or a seasoned watercolor painter, these tips, tricks, and other useful information will help you step up your painting game and produce some stunning artworks. Keep this information on hand for future reference next time your creative juices flow, and you're bound to end up with a work of art you'll want to proudly display!
Frequently Asked Questions
What Are the Ideal Shades for Fall Watercolor Painting?
A fall watercolor painting is partly made up of the chosen landscape, and partly the chosen watercolors. For the best fall-themed watercolor painting, a few somber trees with a mountainous background will perfectly reflect those chilly fall months. The best colors to use would be your shades of dark yellows, mixed burnt oranges, red and brown shades. You can also use dark greens to represent the changing of seasons taking place.
What Are the Easiest Beginner Watercolor Ideas?
Generally, the easiest beginner watercolor ideas are the ones that require little detail and are images on their own, without any fancy backgrounds. If you are new to the watercolor painting world, practice painting a butterfly, some clouds, or trees. From there, you can progress to fuller landscape paintings complete with various elements.
Source: https://acrylgiessen.com/en/watercolor-painting-ideas/
0 Response to "Easy Step by Step Watercolor Paintings That Look Awesomely Real"
Post a Comment